How to Install a Surface Vertical Rod Exit Device
![]()
How to Install a Surface Vertical Rod Exit Device
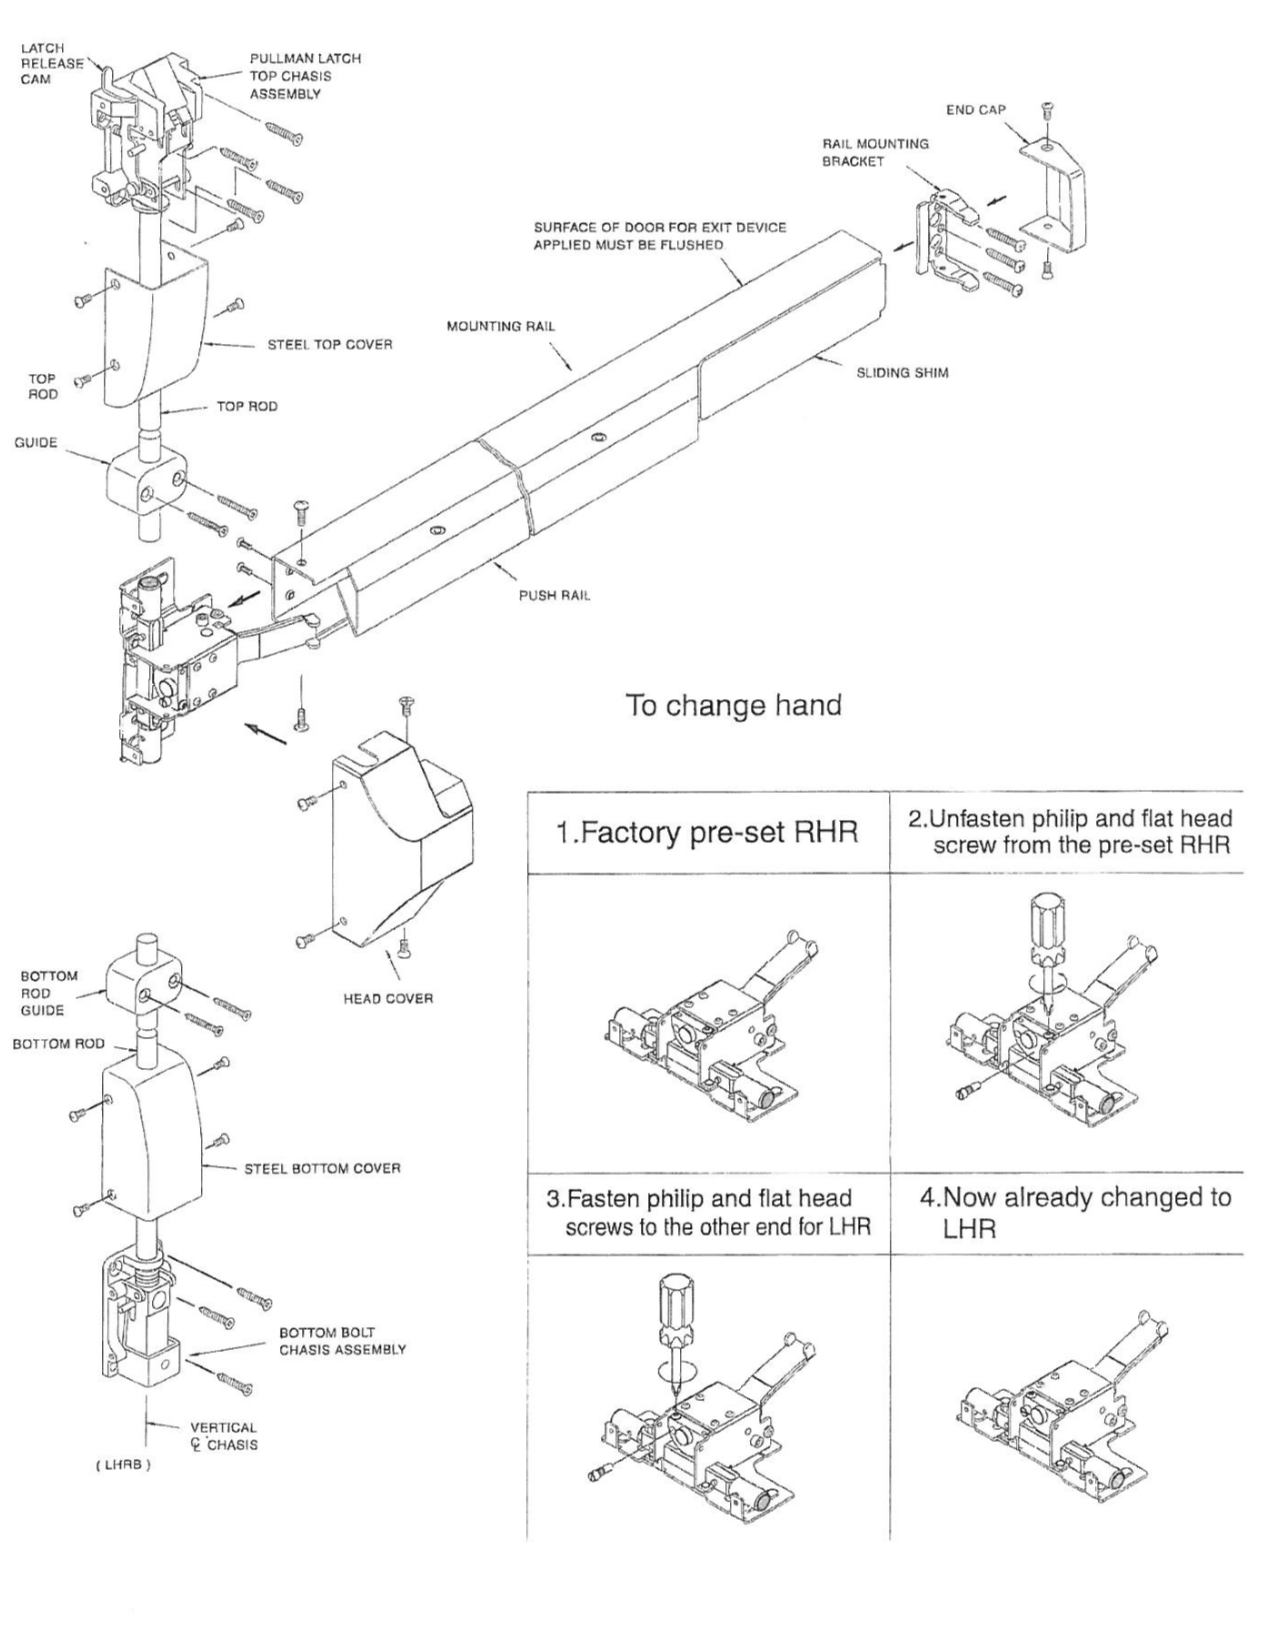
If you're looking to install a surface vertical rod exit device on your commercial door, you've come to the right place. In this guide, we'll provide step-by-step instructions on how to properly install this type of exit device.Before we get started, it's important to note that the installation process may vary slightly depending on the specific brand and model of the device you're working with. Always refer to the manufacturer's instructions for guidance.Here are the general steps to follow for installing a surface vertical rod exit device:
Step 1: Prepare the Door
The first step in the installation process is to prepare the door for the exit device. This may involve drilling holes or making other modifications to the door to accommodate the device. Be sure to measure and mark the door carefully to ensure that the device will be installed correctly.
![]()
![]()
![]()
Step 2: Install the Vertical Rods
Once the door is prepared, you can begin installing the vertical rods that will be used to secure the device to the door. Follow the manufacturer's instructions carefully to ensure that the rods are installed correctly.
![]()
Step 3: Install the Crossbar
Next, install the crossbar that will connect the two vertical rods. This is typically done by sliding the crossbar into place and securing it with screws or other fasteners.
![]()
Step 4: Install the Latchbolt
The latchbolt is the component of the exit device that latches onto the door frame to hold the door closed. Install the latchbolt according to the manufacturer's instructions, taking care to ensure that it is properly aligned with the strike plate on the door frame.
![]()
Step 5: Install the Strikes
The strikes are the metal plates that are installed on the door frame to receive the latchbolt and keep the door closed. Install the strikes according to the manufacturer's instructions, making sure that they are properly aligned with the latchbolt.
Step 6: Test the Device
Once the device is installed, test it to make sure that it is working properly. This may involve opening and closing the door several times to ensure that the latchbolt engages properly and the device operates smoothly.
Step 7: Make Adjustments
If necessary, make any adjustments to the device to ensure that it is working properly. This may involve adjusting the position of the vertical rods or the strike plates on the door frame.
Step 8: Finish the Installation
Once you are satisfied that the device is working properly and all adjustments have been made, finish the installation by securing all screws and other fasteners. Be sure to clean up any debris or excess materials from the installation process.
![]()
Conclusion
Installing a surface vertical rod exit device may seem like a daunting task, but with the right tools and instructions, it can be completed successfully. Always refer to the manufacturer's instructions for guidance and make sure to test the device thoroughly before considering the installation complete. By following these steps, you can ensure that your commercial door is secure and functional.
Commercial door panic bars and exit device hardware are available at
www.autodoorandhardware.com.Disclaimer: The material in this article has no regard to the specific installation, building code requirements, law requirements, authority having jurisdiction, local or state requirements, or any particular needs of any viewer. This article is presented solely for informational and entertainment purposes and is not to be construed as a recommendation or solicitation. Nor should any of its content be taken as advice. Automatic Door and Hardware is not an installation advisor. The views expressed in this article are completely speculative opinions and do not guarantee any specific result. Commercial doors, hardware, and automatic door parts should only be worked on by trained, qualified, and licensed professionals; failure to do so can result in danger. Any opinions expressed in this article are subject to change without notice. Automatic Door and Hardware is not under any obligation to update or keep current the information contained herein. Automatic Door and Hardware may have an interest in the securities and commodities of any entities referred to in this material. Automatic Door and Hardware accepts no liability whatsoever for any loss or damage of any kind arising out of the use of all or any part of this material. Automatic Door and Hardware recommends that you consult with a licensed and qualified professional before making any modifications or repairs to commercial doors, automatic doors, or hardware components of those doors. The content covered in this article is NOT to be considered as advice. I’m NOT an adviser. These are only my own personal and speculative opinions, ideas, theories, hypotheses, charts, technical analysis, insights, and curated news publications. The technical analysis in this article is completely speculative and does NOT guarantee any specific result. The technical analysis in this article has NO proven rate of accuracy. Do NOT repair or modify your doors and/or hardware based upon the analysis presented in this article. Always do your own research and only use trained and licensed professionals for any repairs or modifications. I will NOT be held liable for any of your personal repairs or modifications or any losses/damages that you may incur if you do repair or modify your doors and/or hardware. Information provided through this article is provided to you as is without any express representations or warranties of any kind, and we make no representation or warranty that this article (or any information provided in response to your inquiry), will be accurate, complete, or error-free. You agree that you must evaluate all information and responses, and that you bear all risks associated with, the use of this article, including any reliance on the accuracy, completeness, or usefulness of any information or materials made available through this article. This article is purely for entertainment purposes only!


